Automating end-to-end tests for Chrome extensions
Automated end-to-end tests are standard practice at modern companies like Contentsquare. They allow developers to continuously deploy complex applications, from backend to frontend. For web apps in particular, a vibrant ecosystem of tools and best practices enables developers to be very productive with minimal initial investment.
But what about testing browser extensions? The support for extensions in headless browsers, commonly used for testing, is often experimental, which has largely prevented most test runners from supporting extension testing out of the box. Indeed, starting extensions and interacting with them outside of the page viewport typically requires new APIs.
This article will focus specifically on Chrome and explain our journey setting up reliable end-to-end (E2E) tests for our main browser extension: CS Live.
A brief overview of CS Live
One of the most distinctive features of Contentsquare is Zone-Based Heatmaps, which allows customers to view metrics as an overlay on top of the zones of their website. This feature is implemented as a module in our main web application, but since it uses websites as a background, we thought it would make a perfect browser extension. It enables customers to view their zone metrics without logging into Contentsquare’s web app, resulting in faster insights and streamlined team collaboration.

The importance of end-to-end testing
End-to-end (E2E) testing is a software testing technique that verifies the functionality and performance of an entire application from start to finish by simulating real-world user scenarios and replicating live data. Unlike unit tests, its objective is to identify bugs that arise when all components are integrated, ensuring that the application delivers the expected output as a unified entity.
They are usually more difficult to set up, but are nonetheless critical for extensions like CS Live that interact extensively the DOM of third-party web pages featuring many edge cases.
With strong E2E tests, teams can release more frequently and with greater confidence.
Automating extension testing
Let’s walk through all the steps required to set up end-to-end tests for your Chrome extension.
Step 1: Generate a CRX package
A CRX package is essentially an archive containing necessary files and metadata for an extension to be installed and run in Chrome and other Chromium-based browsers.
Ideally, you should already have an automated way of building CRX files as part of your release process. There are multiple ways to do this. Here is an example using the crx npm package:
const fs = require("fs");const path = require("path");const ChromeExtension = require("crx");
const crx = new ChromeExtension({  privateKey: fs.readFileSync(path.resolve(__dirname, "./key.pem")),});
const crxFile = path.resolve(__dirname, "cslive.crx");
crx  .load(path.resolve(__dirname, "../dist")) // The source of your extension  .then((crx) => crx.pack())  .then((crxBuffer) => fs.promises.writeFile(crxFile, crxBuffer, {}))  .then(() => console.log("CRX File generated"))  .catch((err) => {    console.error("Cannot generate CRX file", err);  });
Step 2: Start a headless Chrome instance with your extension
Contentsquare uses the WebdriverIO framework extensively to test web apps. While there are other ways to run Chrome headless instances, such as Puppeteer, we chose to extend our existing WebdriverIO infrastructure and configuration files like this:
const fs = require("fs");const path = require("path");const csDefaultConfig = require("wdio-contentsquare-defaults.conf.js");const crxFile = path.resolve(__dirname, "cslive.crx");
function getBrowserCapabilities() {  const { capabilities } = csDefaultConfig.config;  const options = capabilities[0]["goog:chromeOptions"];  options.extensions = [Buffer.from(fs.readFileSync(crxFile)).toString("base64")];  options.args = options.args.filter((arg) => arg !== "--disable-extensions" && arg !== "--headless");  options.args.push("--headless=new");  capabilities[0]["goog:chromeOptions"] = options;}
csDefaultConfig.config.capabilities = getBrowserCapabilities();module.exports = csDefaultConfig;
In the code above, we pass the CRX file as a base64 blob and tweak the command-line arguments to enable extensions support.
Most importantly, we enable the new headless mode of Chrome 112+ with --headless=new. This mode relies on a new implementation that is much closer to a windowed Chrome instance, making extension testing possible.
Step 3: Make sure testing domains are whitelisted
If you use a separate domain for testing, you may need to whitelist it in your extension’s manifest.json file to use APIs like runtime.sendMessage(), which allow web page contexts to connect to your extension.
"externally_connectable": { "matches": [ "*://*.contentsquare.com/*", "*://*.qa-website.local/*" ] },Step 4: Navigate to a website and activate the extension
As a setup for our tests, we open our target web page and send a message to the extension to notify it we want to launch a test session.
To connect to our service without logging in interactively, we pass a JSON Web Token to the extension.
await browser.url("http://demo.qa-website.local/testpage.html");const token = await getJwtTokenForTestUser();const extension_id = "<hardcoded value>";
await browser.execute((token, extension_id) => {
  // This code is executed in the browser context  return new Promise((resolve, reject) => {    window["chrome"].runtime.sendMessage(      extension_id,      {        command: "launch-e2e-test",        data: token,      },      () => {        const lastError = window["chrome"].runtime.lastError;        lastError ? reject(lastError) : resolve("Injected");      }    );  });
}, token, extension_id);
Step 5: Listen for commands in the extension
The message passing APIs of Chrome extensions allow us to listen for messages like the one we sent in the previous step. Here is how we use it inside the extension to trigger tests:
function csListenForExternalMessages() { chrome.runtime.onMessageExternal.addListener((message, sender, sendResponse) => { if (message.command == 'launch-e2e-test') { csSaveTokenToSessionStorage(message.data) .then(() => chrome.tabs.query({ active: true, currentWindow: true })) .then(async ([tab]) => { await csEnableExtension(tab); // Testing code is invoked here in the extension context return csRunTest(tab); }) .then((res) => sendResponse(res)); } });}Congratulations! You now have access to both the web page context and the extension context from your testing code. You can now trigger tests and verify that their results on the page are correct.
Conclusion
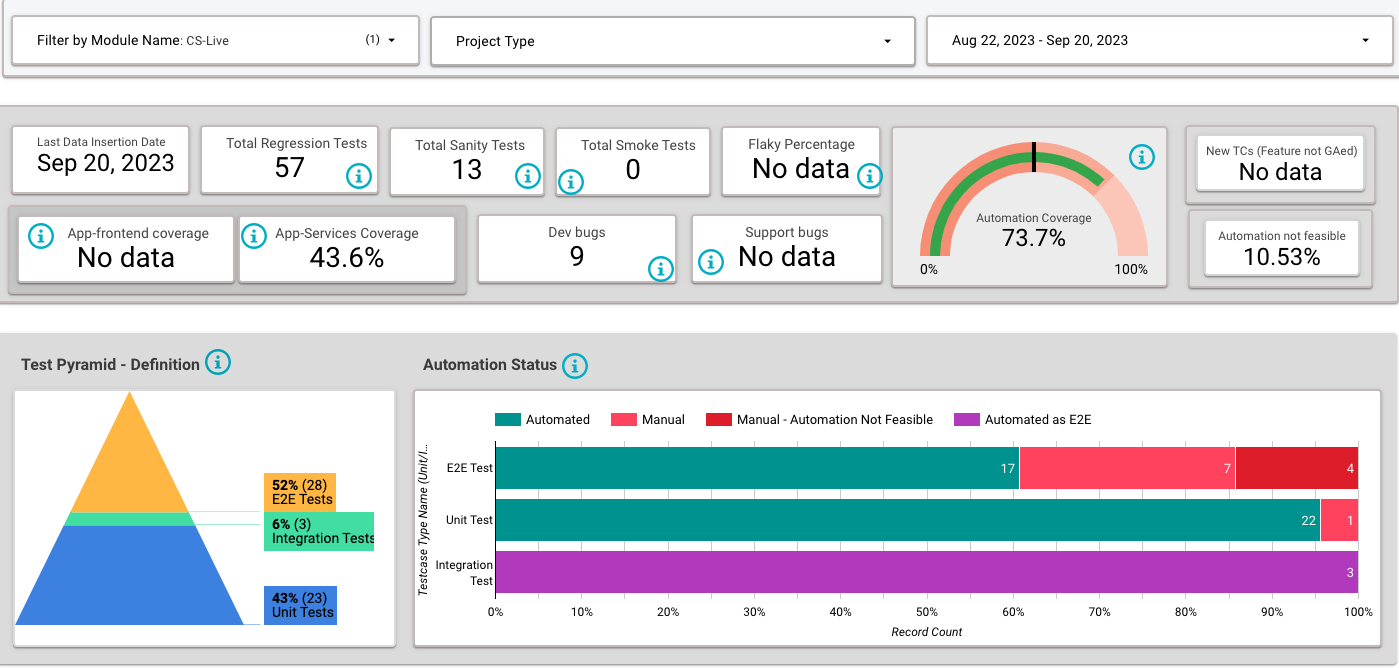
As explained in a previous blog post, we have a comprehensive Quality Dashboard that allows us to track coverage and other metrics over time, including the shape of our Test Pyramid.

As shown in this dashboard, a few months after releasing support for automated tests of CS Live, we had already reached 73.7% coverage with 17 out of 28 E2E tests fully automated.
We hope to continue on this journey towards better testing and that this article will help you improve the quality of your own browser extensions!