Scaling CI in Monorepos
On your journey to growing your company and scaling your code base, you will create several packages in order to share code. This can be because you have adopted micro-services, micro-frontends, or at least to share code between frontend and backend.
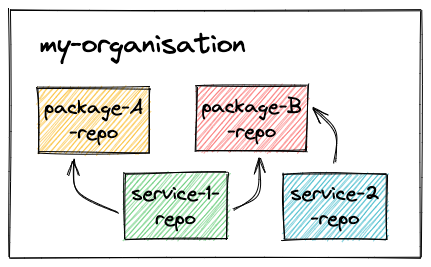
At which point, you will have to decide whether each package should have its own dedicated (git) repository. This is the polyrepo approach:
The alternative is to keep them all in the same repository. This is the monorepo approach:
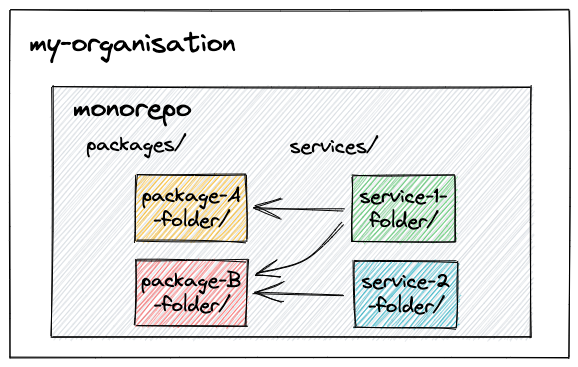
A monorepo should not be confused with a monolith. It means one repository with several packages, not all the code in a single service.
At Contentsquare, we’ve adopted monorepo early on for our Node.js/JavaScript code. Even though we are not looking back, with scaling come challenges, and there is still some significant work to be done in order to grow properly.
In this article, we describe the incremental steps we’ve taken in the last 2 years to keep the CI fast as the number of developers in the team was multiplied by 4 or 5.
We tried to have many code snippets, so that the article is not only theoretical, but can also be used to quickly get started or transform your monorepo.
Basic setup
Folder structure and Workspace
For the monorepo, you have to define the workspace in package.json.
Here’s how it is organized for us:
Folder structure:
packages/ package-A package-B ...services/ service-1 service-2 ...Jenkinsfilepackage.jsonyarn.lockWorkspace:
// with pattern matching // you can also list them manually:{ { "workspace": [ "workspace": [ "packages/*", "packages/package-A", "services/*" "services/service-1" ] // etc} ] }Tools used
Until recently, we have been using Jenkins, so the examples will be taken from our Jenkinsfile, but we will mainly discuss approaches, so you can implement the same with other CI tools, such as GitHub Actions.
We used Lerna for a long time as our monorepo tool, but we’ve recently migrated to Yarn berry/v3 with the plugin-workspace-tools as Lerna was not maintained for a long time (no longer the case) and Yarn provides performance improvements.
Yarn does not provide a means to publish, so we’re using Lerna-Lite for this part.
Read more on Lerna vs Lerna-Lite.
CI Pipeline
Here are the main steps of our pipeline, from source code to published artifacts. This flow is quite standard, not specific to monorepo or even to Node.js ecosystems.

 Checkout
Get the repository code from the remote server. This part is handled by Jenkins internally, no code is required, only configuration.
 Install dependencies
Install the dependencies, usually yarn install, npm install, etc.
stage('install') { steps { sh "yarn install" }} Build
Build
Compile the code, for example tsc for TypeScript.
This may not apply to vanilla JavaScript, unless you are compiling frontend code with Babel or the likes.
stage('build') { steps { sh "yarn build" }}"scripts": { "build": "yarn workspaces foreach --topological-dev run build"} Test
Test
Run unit/integration tests. We separate the tests in two commands for convenience.
stage('tests') { steps { sh "yarn test:unit" sh "yarn test:integration" }}"scripts": { "test:unit": "yarn workspaces foreach run test:unit", "test:integration": "yarn workspaces foreach run test:integration"}"scripts": { // src/tests/unit is an example, you can setup your packages however you like "test:unit": "jest --projects src/tests/unit", "test:integration": "jest --projects src/tests/integration"}Note: See jest project
 Publish
Create the new versions and push the packages onto your (private) artifact repository manager.
stage('publish') { steps { sh "git fetch origin --tags" sh "npx lerna publish --conventional-commits -y" }}Note: We use Conventional commits for versioning.
Quick wins
Avoid unnecessary pipelines
Let’s have a look at the different events that can trigger a CI flow:
- pull request
- new branch
- new commit on branch (all but
master/main) - new commit on branch
master/main - package tag (package-A@2.3.1)
- manual tag (v1.2.3)
If you are using Jenkins with several repositories, you are likely using the Multibranch Pipeline plugin. This plugin allows to react to events from different code repository platforms (Git, GitHub, GitLab, etc.) and trigger the jobs. If instead you’ve done the integration with webhook manually, you probably implemented some of them.
You will have to install a plugin for the code repository platform you’re using, here’s the one for GitHub.
Let’s review each event:
Pull request
Pull requests are part of the normal development flow to check that everything will build and pass the tests before merging, so we keep it.
Branch creation or commit (not main)
For branches that are not main, you may not need to trigger a pipeline.
If some developers need a build and didn’t create a pull request, they can still trigger it manually, but for the vast majority, there will be a pull request.
So there is no point in running the pipeline twice, it will save a lot of resources.
Commit on main branch
After a commit on the main branch, we need again to check the build and tests, then the final step will be publish.
During the publish phase, we bump the version (lerna publish ...), which will also upload all the bumped packages to the remote artifact repository manager, where the new versions will be available to download.
Package tag
As the artifacts are built and published, we do not need a separate pipeline, we can do without the package tag trigger.
Manual tag
As for manual tag, it’s up to you to decide whether you need this pipeline trigger or not.
Summary:
In the end, we recommend to run the pipelines for:
- pull request
new branchnew commit on branch (all butmaster/main)- new commit on branch
master/main package tag ([email protected])- manual tag (v1.2.3) => up to you
Parallelize
At the beginning, you will only have a few packages/services, so running all the steps synchronously for all of them will not be an issue. Then when it becomes too slow, the logical step is to look into how to parallelize the work. There are two ways to go about this: Monorepo execution and CI Tool execution.
Know that with either approach, parallelization does not come for free: make sure that the CPU/RAM on your workers can support it. Without sufficient resources, too much parallelization may even be slower than having everything running synchronously.
Via Monorepo execution
Most monorepo tools have ways to execute actions in parallel, here are a few examples for build:
# lernalerna --concurrency 4 build
# yarn (berry/v3)yarn workspaces foreach --topological-dev --parallel --jobs 4 run build
# turborepoturborepo run build --concurrency 4
Via CI Tool execution
Most CI Tools have ways to execute code on different workers, with Jenkins you can use either the parallel keyword, or matrix.
With default syntax (synchronous):
stage('build') { steps { sh "yarn workspaces foreach run build" }}With Parallel syntax:
stage('build') { parallel { stage('package-A') { step { sh "yarn workspaces foreach --include package-A run build" } } stage('package-B') { steps { sh "yarn workspaces foreach --include package-B run build" } } // etc }}With Matrix:
stage('build') { matrix { axes { axis { name 'PACKAGE_NAME' values 'package-A', 'package-B' // etc } } stages { stage('build package') { steps { sh "yarn workspaces foreach --include ${PACKAGE_NAME} run build" } } }}Tip: if, like us, you are using the declarative syntax with Jenkins, you can create a template file for Jenkins with Mustache, to which you can programmatically inject the list of packages (
'package-A', 'package-B') usingyarn list --jsonorfs.readdir. It avoids manual duplication and simplifies refactoring.
Tip: To replicate the
--concurrency/--jobslogic with Jenkins, you can use the Lockable Resources plugin.
You need to configure the number of resources in Jenkins, then in the pipeline you will add it as follows:
stage('build') { matrix { axes { axis { name 'PACKAGE_NAME' values 'package-A', 'package-B' // etc } }// here options { lock label: 'my-lock-name', quantity: 1 }// here stages { stage('build package') { steps { // command } } } }}Combining the two
Usually in the pipeline, there are some steps that do not depend on each other, and you may also consider running them in parallel.
In our example, test:unit and test:integration are independent.
We can execute both at the same time, and use --parallel to run several packages concurrently.
This also allows you to optimize speed.
For example your integration tests could take twice as long to run as your unit tests, so you can play with the number of packages executed in parallel, and have them roughly run at the same speed.
With default syntax (synchronous):
stage('unit') { steps { sh "yarn workspaces foreach run test:unit" }}stage('integration') { steps { sh "yarn workspaces foreach run test:integration" }}With Parallel syntax:
stage('tests') { parallel { stage('unit') { step { // we set the parallelism at 2, because they are faster sh "yarn workspaces foreach --topological-dev --parallel --jobs 2 run test:unit" } } stage('integration') { steps { // we set the parallelism at 4, because they are slower sh "yarn workspaces foreach --topological-dev --parallel --jobs 4 run test:integration" } } // etc }}Build only affected packages
When you reach the point where even parallelizing is too slow, or just using too much resources, it will be time to work on the real optimization, to detect which packages are affected by changes in a commit and run the CI only for them.
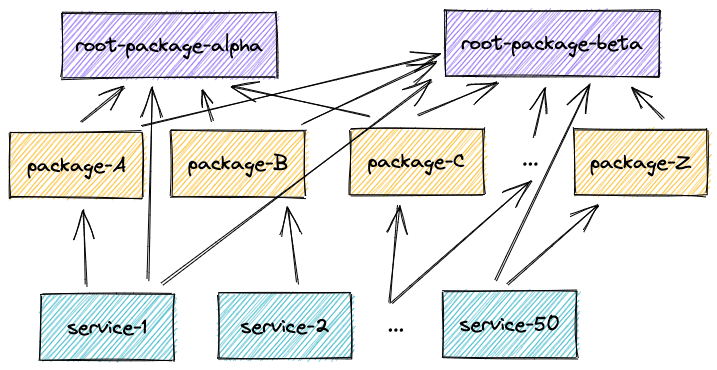
Dependency Graph
Let’s assume our monorepo dependencies look like this:

A few dependency relations
Let’s have a look at those two dependency relations, which should cover all our use cases for now.
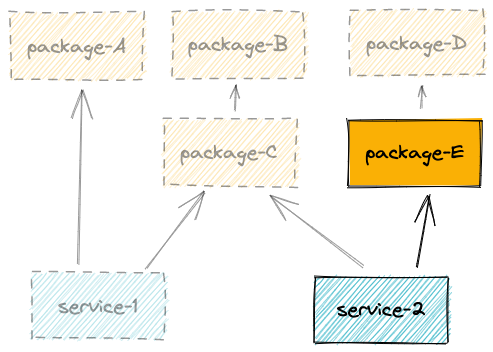

As we can see above, unless you are bumping very core packages or dependencies (ex: TypeScript), it is unlikely that you want to install dependencies, build and test all packages. Let’s see how we can optimize.
--since to the rescue
Concept
We want to know which packages/services are affected by changes that occur between the most recent commit on the branch and the last published commit.
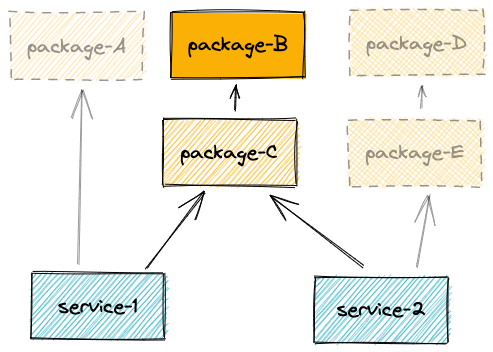
Example of git history:
d95fe49077 fix(service-1): resolve edge case and add unit-testd22160e3e5 feat(package-B): add something newf7de551aa7 (tag: [email protected], tag: [email protected]) chore(release): publishHere, according to the schema we’ve seen above, as package-B is affected, we want to run the pipeline for: package-B, package-C, service-1 and service-2.
As Yarn and Lerna are aware of the dependency tree, those commands accept
the --since [commit] argument, to filter which packages to target.
You can give it a try using ls/list, but it will work the same with build, test:unit, etc.
# lernalerna ls --all --include-dependencies --since f7de551aa7
# yarnyarn workspaces list --json --since f7de551aa7
Changes
With the above, we can now make the following changes
Apply it to build and test (the theory)
// original package.json"scripts": {  "build": "yarn workspaces foreach --topological-dev run build",  "test:unit": "yarn workspaces foreach --topological-dev run test:unit",  "test:integration": "yarn workspaces foreach --topological-dev run test:integration"}
// to"scripts": {  "build": "yarn workspaces foreach --topological-dev --since {BASE_COMMIT} run build",  "test:unit": "yarn workspaces foreach --topological-dev --since {BASE_COMMIT} run test:unit",  "test:integration": "yarn workspaces foreach --topological-dev --since {BASE_COMMIT} run test:integration"}
In practice
In general, the CI tools are not cloning the repository on a specific branch, instead they are only fetching the commit with the change (sometimes it’s not even the same hash as on your branch). This is a problem because you won’t find any publish commit.
What we did to go around this is the following:
Fetch the base branch (main) + the current branch
git fetch origin main:main
# additional fetch for the current branchgit fetch origin my-branch:my-branch
Switch to the branch
git checkout my-branchFind the base commit, we do this by finding the commit of the most recent tag
BASE_COMMIT=$(git rev-list -n 1 $(git describe --abbrev=0))Calculate the affected packages
# lernalerna ls --all --include-dependencies --since "${BASE_COMMIT}"
# yarnyarn workspaces list --json --since "${BASE_COMMIT}"
…then do some scripting to generate the scoping string and assign it to an environment variable:
# lernaWORKSPACE_SCOPE="--scope '{package-B,package-C,service-1,service-2}'"
# yarn (berry/v3)WORKSPACE_SCOPE="--includes=package-B --includes=package-C --includes=service-1 --includes=service-2"
Go back to where you were
git checkout -Here’s the actual change to build and test scripts:
"scripts": { "build": "yarn workspaces foreach --topological-dev ${WORKSPACE_SCOPE} run build", "test:unit": "yarn workspaces foreach --topological-dev ${WORKSPACE_SCOPE} run test:unit", "test:integration": "yarn workspaces foreach --topological-dev ${WORKSPACE_SCOPE} run test:integration"}With these modifications, you will save a lot of time on the build and test steps.
Dynamically modify the workspace to speed up dependencies installation (going beyond)
In a monorepo, the size and number of dependencies can easily amount to several gigabytes, so even reducing this by a few hundred megabytes can be worth saving. If your monorepo contains a lot of packages that do not share the same external dependencies, it can be a good idea to try and optimize the install dependencies part. If your packages/services share most of their dependencies, the gain will be minimal (as the package managers already avoid duplication), but if you have for example different frameworks, etc, it will make sense.
In this section, we explain how we update the workspaces property in package.json to restrict it only to the modified packages.
But before you go there, try to run some benchmarks on install locally by manually modifying the workspaces field in package.json and see if it makes sense (you save more than 1mn for example).
There are a few differences here compared to what we did above.
Instead of calculating the parameters (--includes=...) to execute commands on affected packages, we want to update the workspaces field with what we calculated.
// default workspace // updated workspace:{ { "workspace": [ "workspace": [ "packages/*", "packages/package-B", "services/*" "packages/package-C", ] "services/service-1",} "services/service-2" ] }It may seem strange at first, but it is actually safe:
- All packages affected are still part of the workspace, so they will be symlinked together, built, etc.
- The rest of the packages are not affected, so Yarn will simply download them as normal dependencies from the artifact repository manager, and they don’t need to be published.
Also, as the workspace is restricted to only affected packages, we will not need to add --includes to our build and test commands.
Note: As Lerna requires a clean repository (no pending changes to files), you have to reset (git checkout .) the changes to the workspace before running lerna publish. At this point, we have already run all the steps, so we don’t need it anymore.
Results
After making the modifications, by targeting only affected packages, we save time on all the steps, except publish (which is fast anyway):
install dependencies(optional)buildtest:unittest:integration
The next problem
Now we have reduced the amount of work necessary per change to a minimum. But it’s possible that you have one or more miscellaneous packages that are dependencies of a lot of your other packages.
If those packages are rarely changed, it will not be a problem. But if most commits modify them, then all the work we’ve done so far can actually have little incidence, because changing them will affect a lot of your other packages, and in the end, each pipeline will run on most packages.
We will see in a future article the approach we used to measure and reduce the impact of those packages.